A collection of slope gaugesHere are a variety of tools that assist in measuring the angle of a slope.
Map tools: Percent grade to slope angle conversion chart National Geographic Topo! has a very convenient profiling tool that can be used to generate the slope angle. You use the route tool to draw a route up or down the slope of interest, making sure that the line is perpendicular to the contour lines. If it’s not, you’ll measure the angle somewhat across the hill, not straight up and down. Profile this route, and then click the little plus button at the lower right of the display to isolate the portion of the slope you are interested in. The percent grade of this section is displayed. See the Topo! help files if needed.
Skiers however don’t think in percent grade, so here is a little conversion chart. Mine is printed out and posted right next to my monitor.
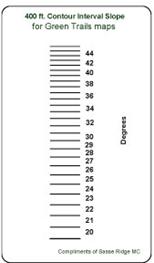
The gauges in this pdf file were generated in Excel, and should be accurate to 1 or 2 degrees. At least that’s what I figured when I made them. I got the idea from something I found in the snow at Smith Brook Road, but was never able to find where it came from. There are gauges for Green Trails maps, as well as my preferred trail maps; NGS Topo! maps printed at 80%. See the example to the left.
Print the gauges out at 100% on transparency film then cover with protective plastic like Contact film. The final printed size is critical; check to see that the gauge is reading correctly before field use.
To use, align the top line on the gauge over a major contour line on the map. Note the angle on the gauge that corresponds to the adjacent major contour line. This gives the average slope over the major contour interval, say 200 or 400 feet. Inside that interval the slope may have portions that are much steeper. You can see why I prefer 7.5 minute maps which have major contour intervals every 200 feet, like the printouts from NGS Topo!
Two slope gauges for field use: Here are two gauges for field use; you can buy various tools for this purpose, but these are free. Such a deal.
The first is based on the idea that your eye is reasonably good at estimating a true horizontal. You orient the gauge so that the top is parallel with the horizon and then sight through the gauge for cross hill estimates, or parallel to the gauge down the fall line. It’s possible to make big errors with this gauge, but practice with it helps. The advantage of this gauge and the one that follows is that there are no moving parts, they are small, waterproof and quick to use. A file with four gauges is here.
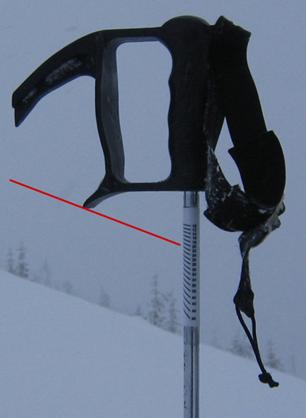
Although you could carry the slope gauge above on a cord around your neck, chances are it would be in a pocket, and getting it out on a stormy day with thick overmitts on would be a pain. I wanted a gauge that’s always deployed, and came up with this, as shown on the left. It works with a standard Life-Link grip. Mounting instructions are included on the image. The idea is that the pole will hang vertically from a finger while you site either across or down the slope. Use cross-slope is illustrated below. Be sure to site directly across the slope, not slightly up or down slope.
Dec 07 |